Frequently Asked Questions

Frequently Asked Questions

Access & Availability

1. How do I create an account?

To create an account or to add a resource to an existing account for the first time, please call us at 416-766-2763 (ext. 228) and we will be happy to assist. We are currently working on making all our K-12 resources available digitally.

Already have an account? Log in at http://learn.thompsonbooks.com

Forgot Your Password? Simply click the Forgot Password? link at http://learn.thompsonbooks.com and we will email you instructions to reset it.

2. How do I reset my password?


Simply click the Forgot Password? link on the login page and we will email you instructions to reset it.


3. I am having trouble activating my account.


The most common issue when creating an account is using web browsers that are out of date, such as Internet Explorer. We recommend using Google Chrome, Mozilla Firefox or Safari.

If you are still having trouble, make sure you are using the most updated version of your selected web browser, or try switching to another web browser all together.


4. I want to continue using my account for another term but my licence has expired.


You can now renew your licence under you Account Settings in the drop-down menu on the top right of your screen.
  1. Select My Account to view your Active/Expired licences
  2. To renew your licence, click Renew
  3. Select your renewal option from the drop-down menu
  4. Fill out the information in this section, and select Done
  5. Complete your Payment Information on the next screen by selecting one of two payment options; pay by Credit Card or Invoice School
Once this section has been completed, your account will automatically renew

Digital Textbook

5. How do I search for key terms or phrases?

You have two options:

Click on the magnifying glass icon in the textbook menu bar to search the entire textbook.

OR

Use your browser’s search function to search the current chapter by pressing Ctrl-F (Windows) or command-F (Mac) . You will see a small search box appear near the top right of your browser. Simply type in the relevant term or phrase to search.

6. How do I highlight text and take notes?

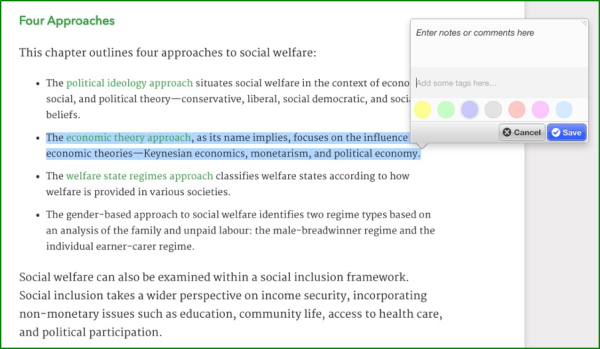
To take notes, highlight a section of text. You will then see a small pencil icon appear. By clicking this icon, you will be given options to:

  • Add notes or comments
  • Add a tag for note filing
  • Add a highlight colour


Please note that adding a note or tag is optional. Click Save when you are happy with your note and highlight color.

You will now notice that your selected text is highlighted with your chosen color. To view your note, simply hover your mouse cursor over the highlighted text and a note bubble will appear. To edit or delete your note, use the icons located in the top right corner of the note bubble.

To view all notes for the current chapter click the Notes icon, located in the textbook menu bar. Here you will also find an option to download chapter notes in PDF format.

7. What is the difference between Media Files and Teacher Files?

Media files are available to both instructors and students. Teacher files are only available to instructors.

8. Where are the student practice quizzes?

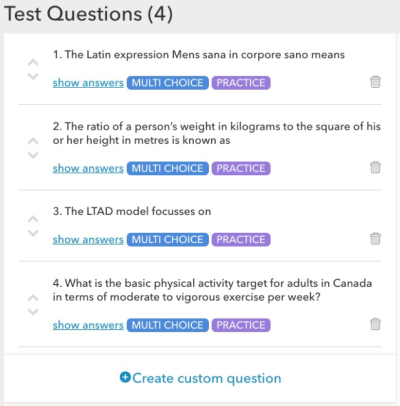
Student practice quizzes are available for those who have access to the digital textbook content. Students can take practice quizzes by clicking on the Quiz icon in the textbook menu bar.

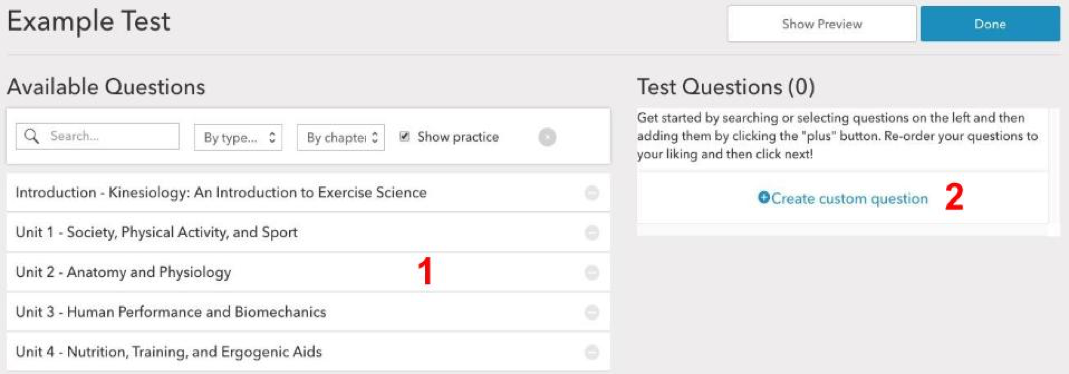
If your students do not have access to the digital textbook, you can create practice quizzes for them using our Custom Test Builder. To learn more, click on How do I create a test?

Digital Classroom

9. How do I create a digital classroom?

  1. Click on the Thompson icon in the top left corner of the screen, this will take you to your Dashboard.
  2. Scroll down to the bottom of the page and select Create Classroom.
  3. Enter your classroom details and add a classroom cover image (optional but recommended.)
  4. Click Create Classroom at the bottom of the page to finalize.
You will now find your digital classroom listed in your Dashboard.


10. Can I create more than one classroom?


Yes you can. Simply follow the same steps you used to create your first classroom. All your classrooms will be listed in your Dashboard, which you can access by clicking on the Thompson icon in the top left corner of your screen.

11. How do I invite students to my classroom?

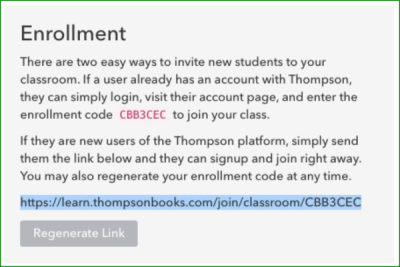
Click the Settings icon on the Classroom menu bar. In your Classroom Settings you will find the enrollment URL for your classroom.

Each classroom you create has a unique access code and URL. By sharing this URL with your students they will automatically join your class when they create an account.

The Regenerate Link button will create a new URL, replacing the old one. When you regenerate the link, the old link becomes inactive. We have added this feature to give you more control over who accesses your classroom. If you find that uninvited names are joining, you can remove them from your classroom and regenerate the link to ensure they can not re-join.

12. How do I purchase Digital Student Textbook - Classroom Credits for my students?

Some of our resources allow teachers to purchase and assign Digital Student Textbook - Classroom Credits. You can purchase Digital Student Textbook - Classroom Credits under you Account Settings.

  1. Select My Account to view your available licences
  2. You will see Digital Student Textbook - Classroom Credits, on the right hand side of your screen (only if they are available for your resource)
  3. Select Purchase
  4. Fill in the number of credits you wish to purchase and the remaining information in this section. Select Done
  5. Complete your Payment Information on the next screen by selecting one of two payment options; pay by credit card or Invoice School
In your Account Settings you will now see the available credits which you can assign to students.

13. How do I assign digital student textbooks?

In order to assign digital student textbooks, you must ensure that your students have already enrolled in your classroom.

  1. Select your classroom for you dashboard
  2. On your Classroom Menu Bar, select Settings
  3. Under your Classroom Settings, select Manage Students
  4. Under Assign Digital Textbook Credits, select the boxes beside each students' name to assign a textbook
Note that once you have assigned a Digital Textbook Credit you cannot reassign it to another student.

14. How do I remove students from my classroom?


Click on the Manage Students tab, which is located under your Classroom Settings. Simply click Remove Student to revoke their access.

15. How do I delete a classroom?

Classrooms cannot be deleted; they can be archived. Archiving a classroom will remove it from view but it will be stored in the background for future reference.

To archive a classroom:

  1. Select the classroom from your Dashboard
  2. Click the Settings icon in the classroom menu bar
  3. At the bottom of the classroom settings page, click Archive
  4. You will be asked to confirm. Click OK or Yes to confirm


16. How do I re-activate an archived classroom?


To re-activate an archived classroom:
  1. Select My Account from the top-right drop down menu
  2. Under Account Settings, click Show Details
  3. Select Archived to see the list of archived classrooms
  4. Click Unarchive next to the classroom you would like to re-activate


17. I am unable to upload an image for my classroom


This may be because you are using an outdated version of your web-browser. Try installing the latest version of your web browser. Alternatively, you can try using a different browser. We recommend Google Chrome, Mozilla Firefox or Safari.

Calendar

18. Where is my calendar?

Your classroom calendar is a feature of the digital classlroom. If you have not created a classroom, see How do I create a digital classroom?

Once you have created a classroom you will see the calendar icon in the classroom menu bar.

19. How do I add events to my calendar?

The Calendar is a feature that is shared with your students. You can create three different types of calendar events:

Assessment events: Automatically added when you create and assign an online test. Cannot be added manually.

Personal events: Manually added events only visible to you as an instructor.

Classroom events: Manually added events also visible to your students.

To create a Personal or Classroom event click New Event in the top right of the calendar. All newly created events are Personal by default but you can make them Classroom events (visible to students) by selecting Make this event visible to students.

20. How do I edit or delete an event?

Click on the event on the calendar. You will now have the option to make changes or delete the event.

21. Can I upload files to an event?

Once you have created a personal or classroom event, you can upload files. Files uploaded to classroom events will be visible to your students; files uploaded to your personal events will only be visible to you.

  1. Click the event on the calendar
  2. Click on the grey box on the right side of your screen under Event Files
  3. Select the file you would like to upload
  4. Click Update Event


22. How do I set reminders for calendar events?


For assessment events, students enrolled in your classroom will automatically receive an email notification when you assign a new online test or quiz and will also be sent an email reminder at 8 AM EST the day before it is due.

For personal and classroom events, you have the option of sending an email reminder at 8 AM EST the day before the event is due. Simply check off 'Send email reminder for this event' when you create your event.

Tests

23. How do I create a test?

To create a test:

  1. Click the Test icon in the classroom menu bar
  2. Select Create New Test at the top right of the screen
  3. Enter a title and instructions (optional). Click Save.
Your test is now listed under Available Tests. To add questions to your test click the Blue + Questions icon


You now have the option of selecting questions from our test bank, or creating your own custom questions.

To add questions from the test bank
  1. To the left of your screen, under Available Questions click on the unit that contains the chapter you would like to select questions from
  2. Select the chapter from the drop down menu that appears
  3. Click on the blue arrow to the right of each question to add the question (Note that the questions that are labeled 'practice' are available to students who have access to the practice quizzes contained in the digital textbook)
To create a custom question:
  1. Select 'Create custom question' under Test Questions to the right of your screen
  2. Fill in the question text (you have the option of adding an explanation or hint and uploading an image)
  3. Select which chapter you would like your custom question to be saved to
  4. Select the question type (note that short answer questions will not be automatically graded by the system)
  5. For multiple choice questions, type in one answer option and then click Add Option to add additional options
  6. For multiple choice and true/false questions, select the correct answer
  7. Click Save Question


As you add questions to your test, you will see a quick preview of the questions on the right side of the screen. You can easily remove a question by clicking the 'trashcan' icon on the right side. You can re-order the questions by simply dragging and dropping the appropriate position.


When you have finished adding your questions, click Preview to see a snapshot of your test/quiz. If you are satisfied, click Done. You can now assign the test to your students.

24. Can I copy a test from a previous classroom?


Yes, as soon as you create a test, it is automatically saved to your account and you can reuse it in your other classrooms.
To reuse a test:
  1. Click on the Tests icon in the classroom men bar
  2. Select the 'copy test from another classroom' button
  3. Select the test you would like to copy from the list of tests provided


25. Can I download and print my tests for offline use?


Yes, once you have created a test:
  1. Select either 'download as pdf' or 'download as docx.' (Note: using the 'docx' option will give you an editable file, which enables you to manually add your own questions to the test.)
  2. Save the file to your computer and print it off for students to take in class

26. How do I assign an online test for my students to complete?

Once you have created a test:

  1. Select Assign to class
  2. Select a Due Date and the time you would like the test completed by
  3. Set how many attempts you would like your students to have. You may give them up to three attempts and the system will track the result for each attempt. The student's best score will be used towards their average grade.
  4. Click Assign Test to activate the test and make it visible on the classroom calendar
Students will receive an automated email as soon as you assign the test as well as a reminder email at 8 AM EST the day before the test is due.

27. How do I view student test results?

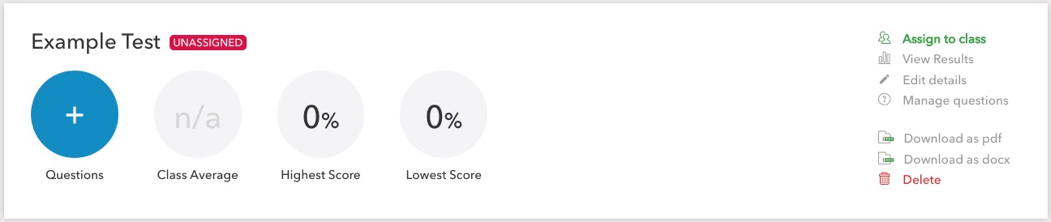
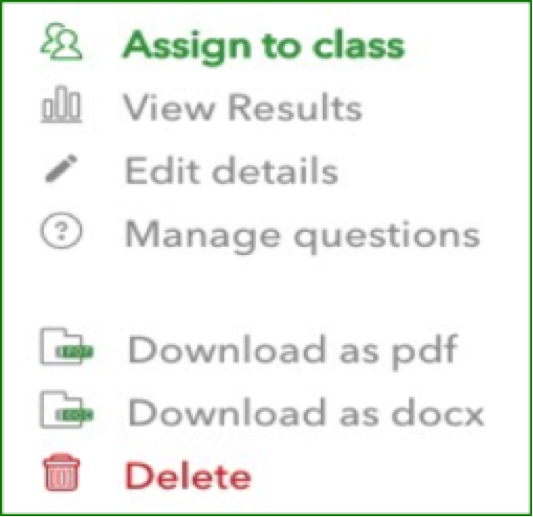
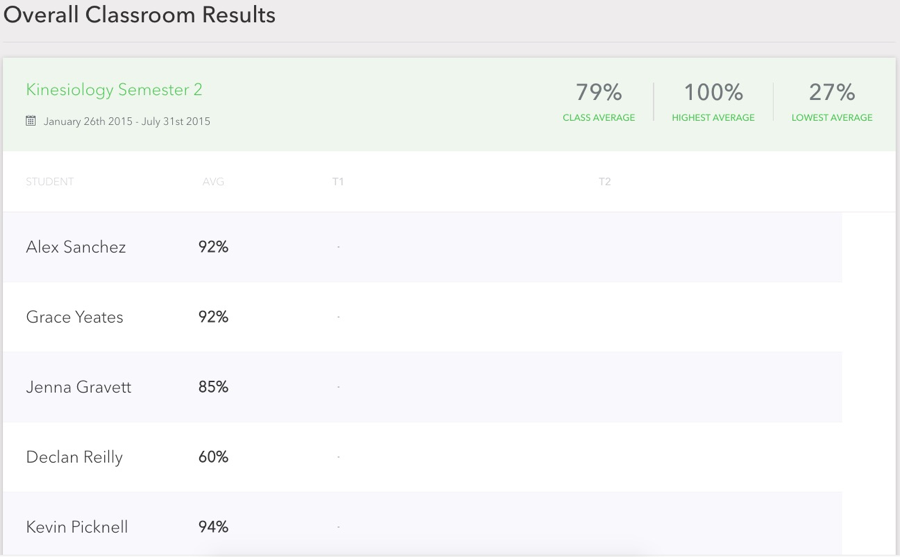
To view your students' results for online quizzes or tests you have two options.

  1. You can see the results for individual online tests/quizzes by clicking on 'view results' to the right of an individual test/quiz. To see which questions your student got right or wrong, click on their grade


  2. You can see the overall classroom results for all of the online tests/quizzes you assigned by clicking on the Markbook icon in your classroom menu bar

28. Can students see their own online test results?

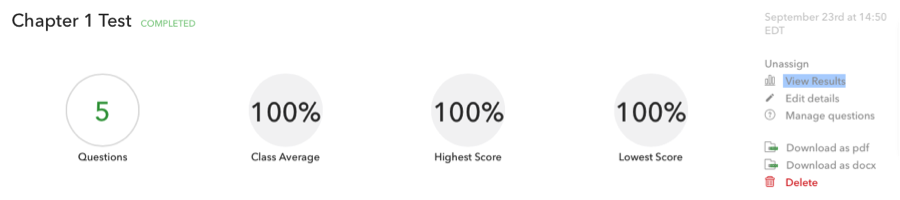
Yes, to help build transparency, we allow students to see which questions they got right or wrong once a test has expired. Students can view their own results by clicking on the Tests icon in their classroom menu bar, and then selecting 'view results'.

29. How do I export my students' results?


You can export your students' tests results from your classroom Markbook. Simply click on the Markbook icon on your classroom menu bar and then select Export CSV from the top right-hand side of the screen.

30. Can I email progress reports to students' parents/guardians?


To enable the email parent/guardian function:
  1. Click on the settings icon in your classroom menu bar
  2. At the bottom of the page check off 'Show option to add student's parent/guardian email address and send them classroom progress reports'
  3. Select Update Classroom
To add parent/guardian email addresses:
  1. Click Manage Students from your Classroom Settings page
  2. In the Guardian Email column, input the email address for your students' parent/guardian
To send progress reports:
  1. Click on the Markbook icon in your classroom menu bar
  2. Click the Email all Parents/Guardians button at the top right hand side of the screen to email progress reports to all your students parents/guardians
  3. Click 'Email progress report to parent/guardian' next to an individual student to send a single progress report to a particular parent/guardian